由于业务对页面性能要求很高,如果下拉框数据很大,如果一个页面有多个下拉框,那么就导致页面很卡顿。由于elementPlus已经支持了下拉组件虚拟列表,但是所在项目仍然使用elementUI2.0,所以需要自己扩展支持下拉组件虚拟列表,以下是笔者总结的一篇关于elementUI2.0支持下拉框虚拟列表的实践方案,希望看完在项目中有所帮助。
正文开始...
在开始本文之前,笔者主要会从以下方向上去实现该业务需求
1、尝试在原有elementUI组件上,写一个自定义指令,支持下拉虚拟列表
2、尝试使用社区成熟的虚拟列表插件方案实现虚拟列表
前置
我们知道虚拟列表本质上就是在可视区域内显示对应的数据,由于数据是按需加载,所以我们首先就要明白如何实现虚拟列表,具体可以参考以前写的一篇文章了解虚拟列表背后原理,轻松实现虚拟列表
快速实现页面
我们是使用vue-cli2快速搭建了一个基本项目
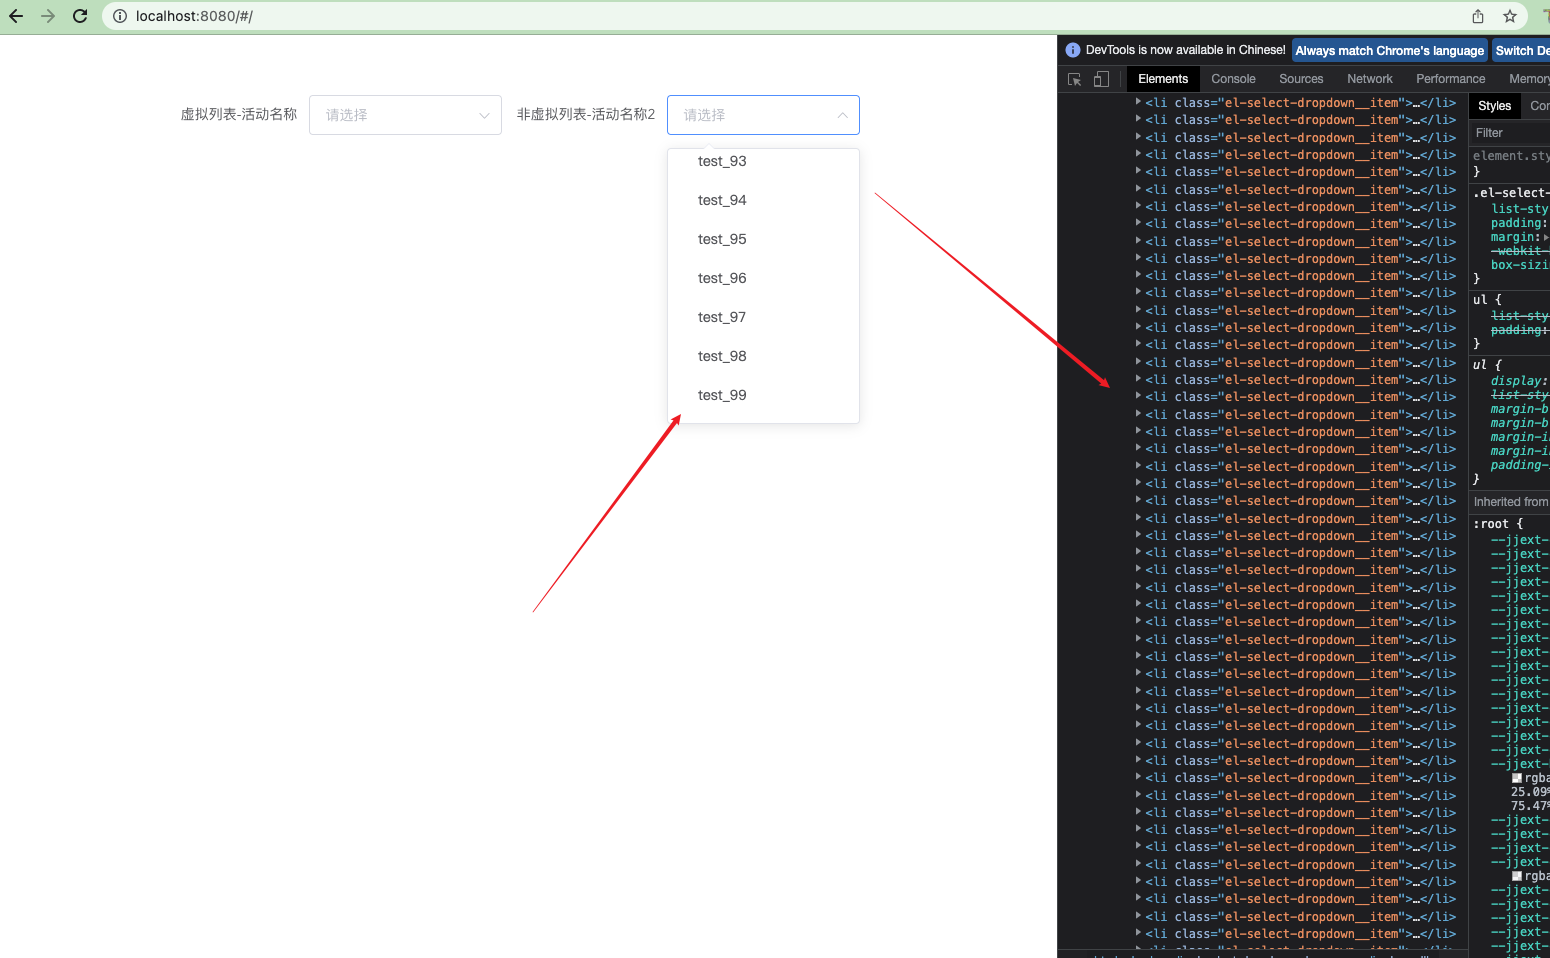 我们可以非常清晰的看到右侧下拉测试
100条数据直接渲染出来的
我们看下实际代码
 <el-form-item label="非虚拟列表-活动名称2">
      <el-select v-model="form.value" placeholder="请选择">
        <el-option
          v-for="item in sourceData"
          :key="item.value"
          :label="item.label"
          :value="item.value"
        >
        </el-option>
      </el-select>
</el-form-item>
对应数据就是在created中直接生成了一组100条数据
export default {
  name: 'hello-word',
  data() {
    return {
        sourceData: []
    }
  },
  created () {
    var arr = new Array(100).fill(1);
    arr.forEach((v, index) => {
      this.sourceData.push({
        value: index,
        label: `test_${index}`
      });
    });
  }
}
我们先看下左侧虚拟列表 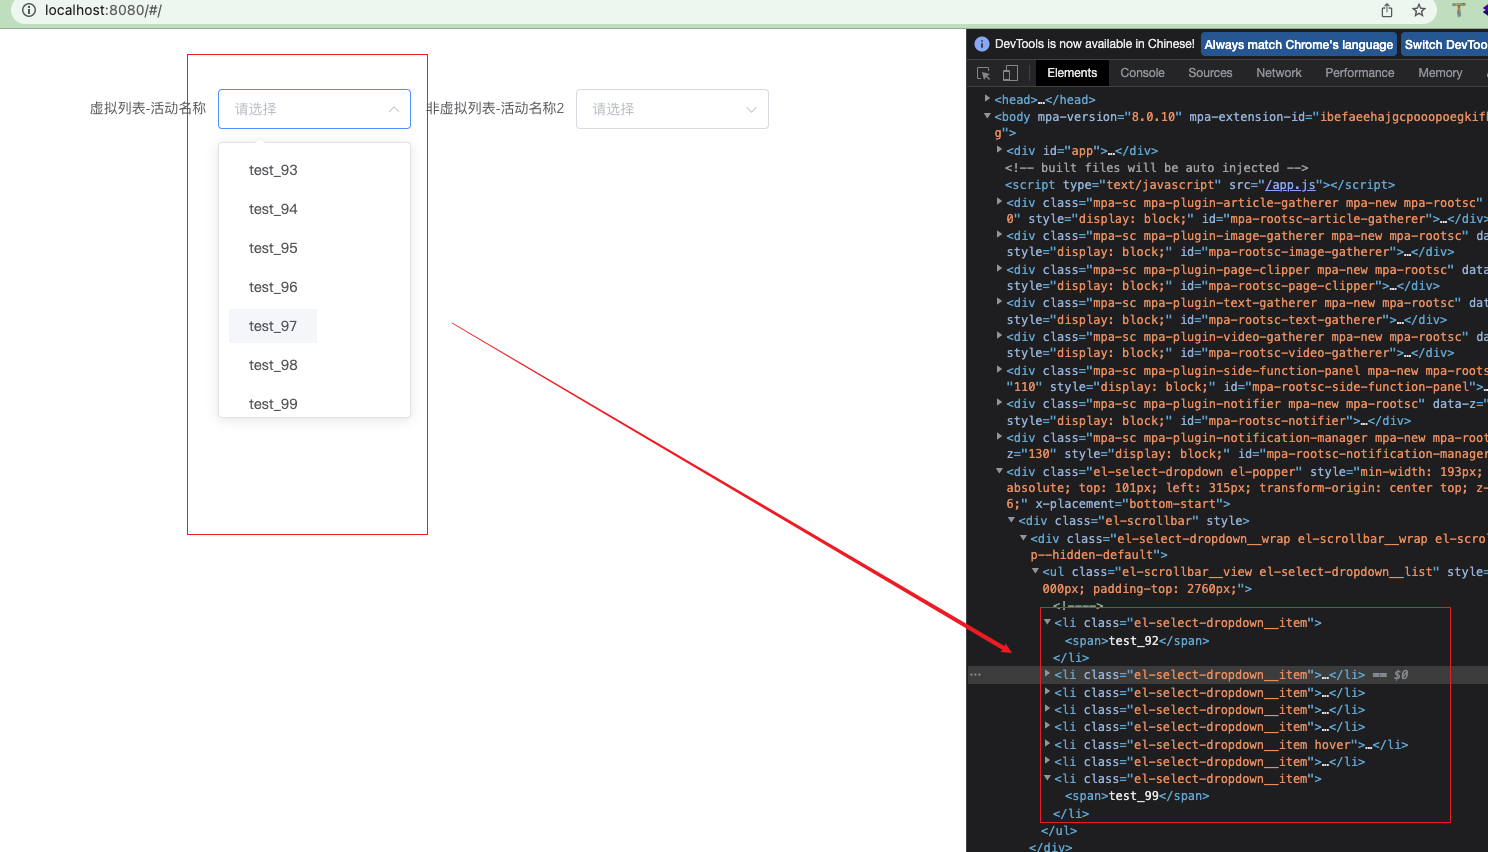
下拉框并不是一次性渲染所有数据,而是按需获取可视区域的数据,这是如何实现的?
虚拟列表指令
主要思路就是控制下拉数据显示条数,本质就是要控制optionsData
 <el-form-item label="虚拟列表-活动名称">
      <el-select
        v-model="form.value1"
        placeholder="请选择"
        @visible-change="handleVisibleChange"
        v-select="{ ...selectAttrs, data: sourceData }"
      >
        <el-option
          v-for="item in optionsData"
          :key="item.value"
          :label="item.label"
          :value="item.value"
        >
        </el-option>
      </el-select>
</el-form-item>
我们看到v-select指令上主要有data,selectAttrs,data是原数据,selectAttrs主要是虚拟列表需要的参数
selectAttrs
export default {
  name: 'hello-world',
  data() {
    return {
      sourceData: [], // 原始数据
      selectAttrs: {
        viewHeight: 220, // 可视区域的高度
        rowHeight: 30, // 当前行的默认高度
        startIndex: 0,
        endIndex: 0,
        callback: this.updateOptions,
        scrollView: null // 滚动容器
      }
    }
  }
}
从指令配置所需要的参数来看,主要是以下几个关键字段:
viewHeight可视区域的高度
rowHeight当前行的默认高度
startIndex数据起始位置
endIndex数据默认位置
callback执行回调,主要是控制下拉数据
scrollView监听滚动容器
然后我们看下指令是如何编写的
const selectDirectives = {
  wrap: null,
  fn: null,
  select: {
    inserted (el, binding, vnode) {
      let { data, rowHeight, startIndex, callback, filterable } = binding.value;
      const {
        componentInstance: { $children: children }
      } = vnode;
      const selectDown = children[children.length - 1];
      const [elScrollBar] = selectDown.$children;
      const [wrap] = elScrollBar.$el.childNodes;
      const scrollView = wrap.getElementsByClassName('el-scrollbar__view')[0];
      const total = data.length; // 所有数据的总条数
      // 设置el-scrollbar__view的高度
      if (filterable) {
        scrollView.style.height = 'auto';
      } else {
        scrollView.style.height = `${total * rowHeight}px`;
      }
      let timer = false;
      const fn = () => {
        if (timer) {
          return;
        }
        timer = true;
        const requestId = setTimeout(() => {
          timer = false;
          const scrollTop = wrap.scrollTop;
          // 计算当前滚动位置,获取当前开始的起始位置
          const currentIndex = Math.floor(scrollTop / rowHeight);
          // console.log(startIndex, 'startIndex222', currentIndex);
          // 根据滚动条获取当前索引与起始索引不相等时,将滚动的当前位置设置为起始位置
          if (currentIndex !== startIndex) {
            startIndex = Math.max(currentIndex, 0);
          }
          const paddingTop = `${startIndex * rowHeight}px`;
          scrollView.style.paddingTop = paddingTop;
          // eslint-disable-next-line standard/no-callback-literal
          callback({ startIndex, scrollView });
        }, 100);
        if (!requestId) {
          clearTimeout(requestId);
        }
      };
      selectDirectives.fn = fn;
      selectDirectives.wrap = wrap;
      wrap.addEventListener('scroll', fn, false);
    },
    unbind () {
      selectDirectives.wrap.removeEventListener('scroll', selectDirectives.fn);
    }
  }
};
关键的几点
1、找到内容滚动容器wrap,主要是通过componentInstance找到下拉滚动父容器
2、设置滚动容器内部高度scrollView【必须要设置】,不设置的话,内容数据将无法滚动显示
let { data, rowHeight, startIndex, callback } = binding.value;
const {
  componentInstance: { $children: children }
} = vnode;
const selectDown = children[children.length - 1];
const [elScrollBar] = selectDown.$children;
const [wrap] = elScrollBar.$el.childNodes;
const scrollView = wrap.getElementsByClassName('el-scrollbar__view')[0];
const total = data.length; // 所有数据的总条数
// 设置el-scrollbar__view的高度
scrollView.style.height = `${total * rowHeight}px`;
用一张图还原一下,为什么需要设置scrollView的高度,以及当内部容器滚动时,我们需要给内部设置一个paddingTop,不然显示就会有空白块 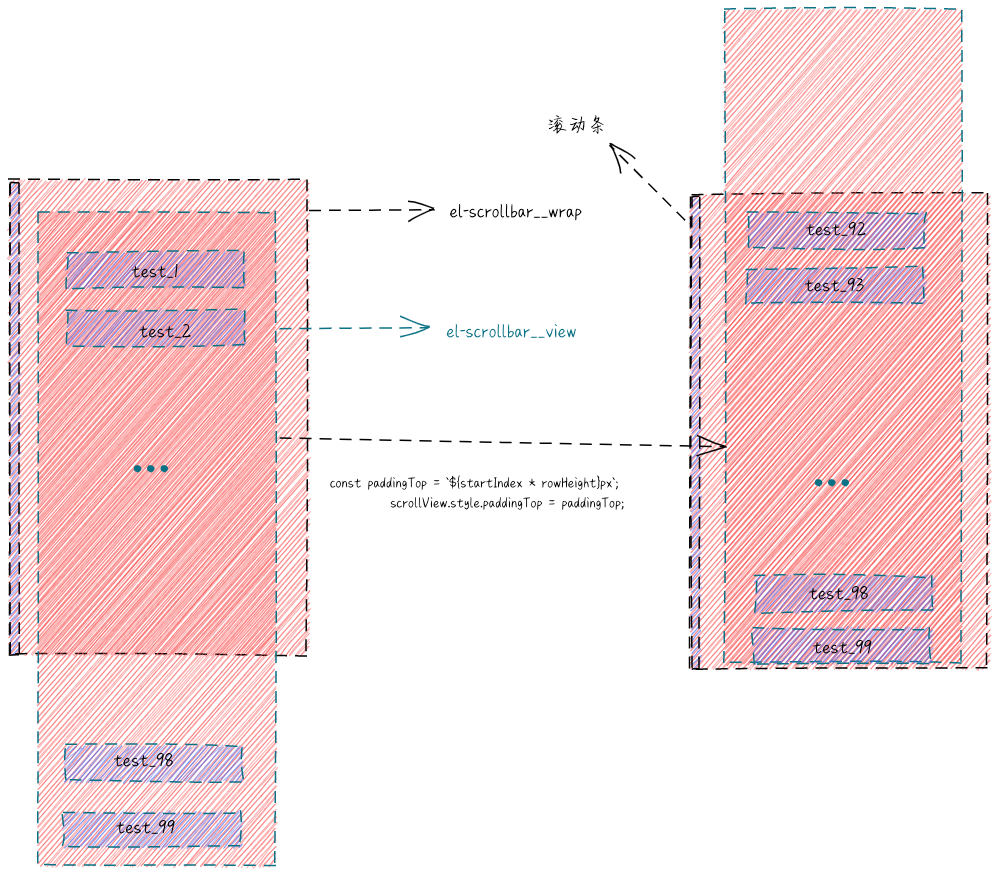
3、确定当前滚动的起始位
主要是当我们滚动容器时,根据滚动的位置确定起始位,核心代码如下
   const scrollTop = wrap.scrollTop;
   // 计算当前滚动位置,获取当前开始的起始位置
  const currentIndex = Math.floor(scrollTop / rowHeight);
  // console.log(startIndex, 'startIndex222', currentIndex);
  // 根据滚动条获取当前索引与起始索引不相等时,将滚动的当前位置设置为起始位置
  if (currentIndex !== startIndex) {
    startIndex = Math.max(currentIndex, 0);
  }
  const paddingTop = `${startIndex * rowHeight}px`;
  scrollView.style.paddingTop = paddingTop;
  // eslint-disable-next-line standard/no-callback-literal
  callback({ startIndex, scrollView });
4、我们看到有callback执行回调返回出去了startIndex,scrollView
所以从最初设计指令时,我们看到了指令的selectAttrs上有一个callback
 ...
 selectAttrs: {
    viewHeight: 250, // 可视区域的高度
    rowHeight: 30, // 当前行的默认高度
    startIndex: 0,
    endIndex: 0,
    callback: this.updateOptions,
    scrollView: null // 滚动容器
}
指令执行回调
主要看updateOptions
methods: {
  updateOptions ({ startIndex, scrollView }) {
      this.selectAttrs.startIndex = startIndex;
      this.selectAttrs.scrollView = scrollView;
      this.renderOptions();
   },
}
我们看下renderOptions这个方法,主要是更新下拉框数据
...
 renderOptions () {
      let {
        selectAttrs: { viewHeight, rowHeight, startIndex, endIndex },
        sourceData
      } = this;
      const total = sourceData.length;
      // 可视区域的条数
      const limit = Math.ceil(viewHeight / rowHeight);
      // 设置末位索引
      endIndex = Math.min(startIndex + limit, total);
      this.selectAttrs.endIndex = endIndex;
      this.optionsData = sourceData.slice(startIndex, endIndex);
},
以上比较关键的一行代码就是根据回调函数中的startIndex以及limit确认最后的endIndex, 以下是核心关键代码
 const limit = Math.ceil(viewHeight / rowHeight);
      // 设置末位索引
 endIndex = Math.min(startIndex + limit, total);
最后我们就是根据起始位对愿数数据进行slice操作,确认真正需要显示的数据
this.optionsData = sourceData.slice(startIndex, endIndex);
对应的页面显示
<el-select
    v-model="form.value1"
    placeholder="请选择"
    @visible-change="handleVisibleChange"
    v-select="{ ...selectAttrs, data: sourceData }"
 >
    <el-option
      v-for="item in optionsData"
      :key="item.value"
      :label="item.label"
      :value="item.value"
    >
    </el-option>
</el-select>
然后我们注意到,我们在下拉框下绑定了一个@visible-change="handleVisibleChange"方法,实际上只有我们在打开下拉框时才会需要触发更新下拉,所以我们需要调用renderOptions
...
 handleVisibleChange () {
    const {
      selectAttrs: { scrollView }
    } = this;
    // 当打开下拉框时,重置scrollView的paadingTop,避免白屏
    if (scrollView) {
      scrollView.style.paddingTop = '0px';
    }
    this.renderOptions();
}
但是我们注意到,这里我们重置了scrollView的paddingTop,因为我们在滚动时设置了paddingTop,所以此时我们需要重置paddingTop就是为了回显我们上次选择的内容区域
由于我们设置了内容器的高度,所以如果有设置过滤搜索,就会显示有问题,于是我们在过滤搜索时,就将高度置auto
let { data, rowHeight, startIndex, callback, filterable } = binding.value;
const {
      componentInstance: { $children: children }
 } = vnode;
  const selectDown = children[children.length - 1];
  const [elScrollBar] = selectDown.$children;
  const [wrap] = elScrollBar.$el.childNodes;
  const scrollView = wrap.getElementsByClassName('el-scrollbar__view')[0];
  const total = data.length; // 所有数据的总条数
  // 设置el-scrollbar__view的高度
if (filterable) {
    scrollView.style.height = 'auto';
  } else {
    scrollView.style.height = `${total * rowHeight}px`;
}
...
挂载指令
主要是局部注册就行
// 指令
const selectDirectives = {
  wrap: null,
  fn: null,
  select: {
    inserted (el, binding, vnode) {
    ...
  }
};
然后我们需要挂在在当前单文件中
export default {
  name: 'HelloWorld',
  data () {
    return {
      msg: 'Welcome to Your Vue.js App',
      form: {
        value1: '',
        value2: ''
      },
      sourceData: [],
      optionsData: [],
      selectAttrs: {
        viewHeight: 220, // 可视区域的高度
        rowHeight: 30, // 当前行的默认高度
        startIndex: 0,
        endIndex: 0,
        callback: this.updateOptions,
        scrollView: null, // 滚动容器
        filterable: true
      }
    };
  },
  directives: selectDirectives,
  ...
}
最终结果就是下面这样了 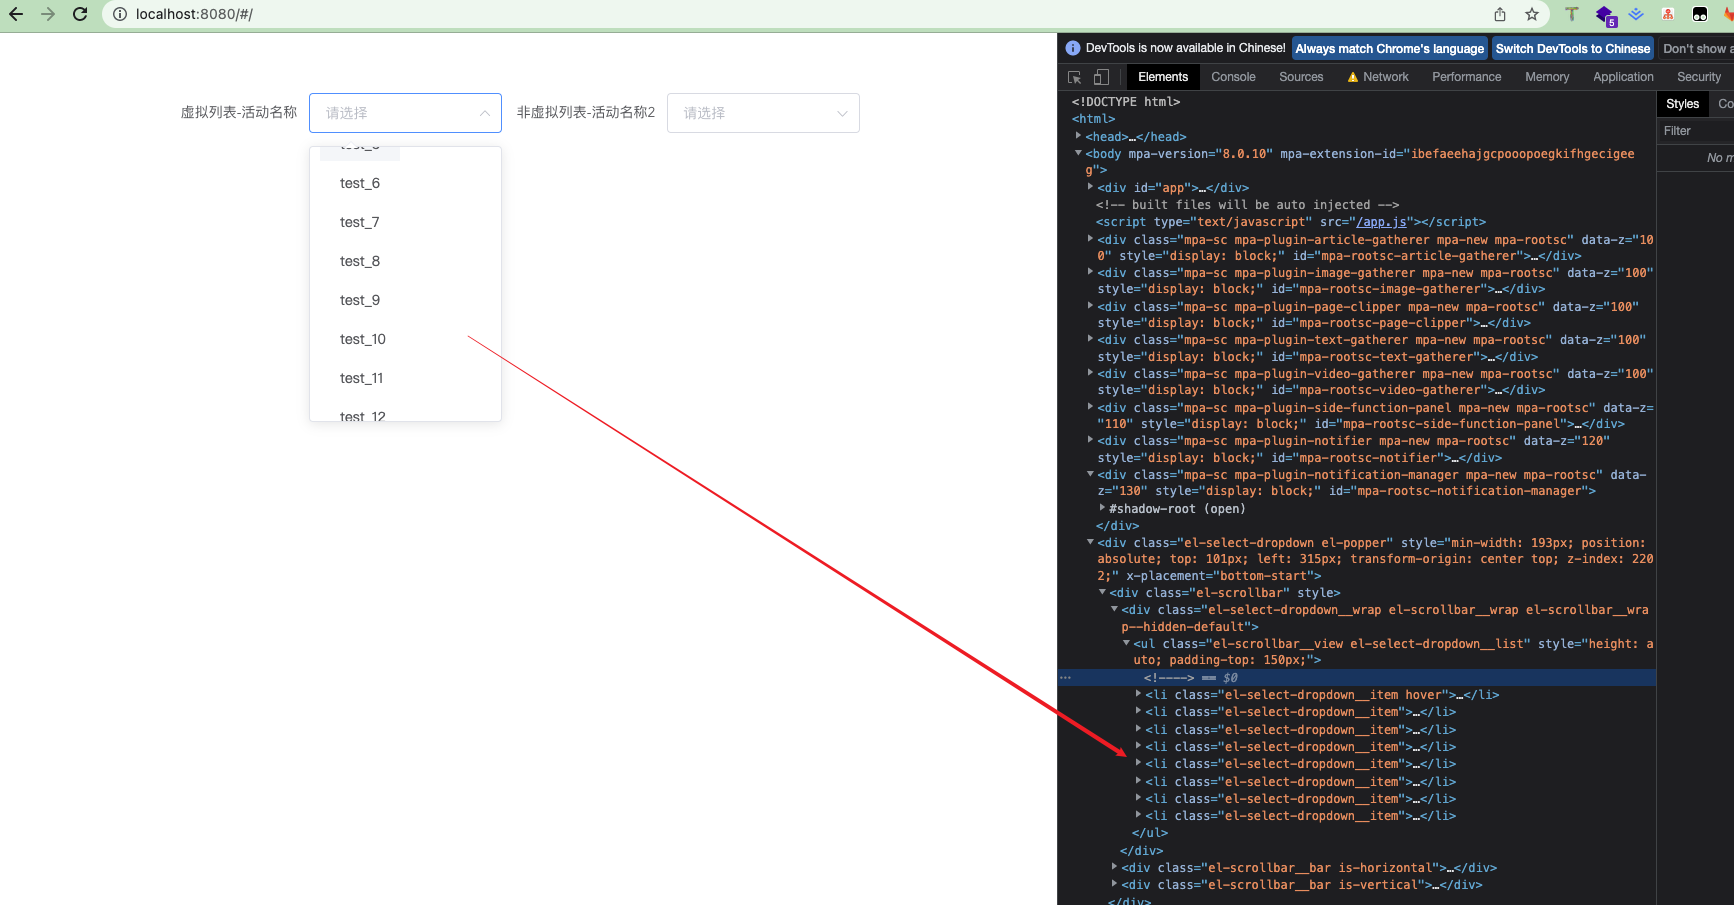
vue-virtual-scroll-list插件实现虚拟列表
在以上例子中我们尝试用自己写的指令已经满足虚拟列表,那如果不用自己写的指令,使用社区的方案,会不会更快,更简单呢?我们考虑主要是用这个社区插件,实现起来就更简单
<template>
  <div class="hello">
    <el-form ref="form" :model="form" inline>
      <el-form-item label="活动名称">
        <el-select
          v-model="form.value"
          placeholder="请选择"
          @visible-change="handleVisibleChange"
          ref="select"
        >
          <virtual-list
            :data-key="'id'"
            :data-sources="sourceData"
            :data-component="optionComponent"
            :keeps="10"
            :extra-props="extraProps"
            style="max-height: 245px; overflow-y: auto;"
          >
          </virtual-list>
        </el-select>
      </el-form-item>
    </el-form>
  </div>
</template>
引入vue-virtual-scroll-list
import virtualList from 'vue-virtual-scroll-list';
const optionComponent = {
  props: {
    source: {
      type: Object,
      default () {
        return {};
      }
    },
    label: String,
    value: String
  },
  template:
    '<el-option :label="source[label]" :value="source[value]"></el-option>'
};
export default {
  name: 'HelloWorld',
  components: {
    virtualList
  },
  data () {
    return {
      msg: 'Welcome to Your Vue.js App',
      form: {
        value: ''
      },
      optionComponent,
      sourceData: [],
      extraProps: {
        label: 'label',
        value: 'value'
      }
    };
  },
  methods: {
    handleVisibleChange () {
      const select = this.$refs.select;
      const child = select.$children;
      const [, selectDrop] = child;
      const [cchild] = selectDrop.$children;
      const [a] = cchild.$children;
      const [group] = a.$el.children;
      group.style.paddingTop = '0px';
      console.log(group);
    }
  },
  created () {
    var arr = new Array(100).fill(1);
    arr.forEach((v, index) => {
      this.sourceData.push({
        value: index,
        label: `test_${index}`,
        id: Math.random()
      });
    });
  }
};
我们注意到handleVisibleChange同样是将滚动容器的paddingTop置零了,这样保证,打开下拉框时不会白屏。
并且如果是用插件,就必须要有id,virtual-list上指定data-key

总结
主要是写了一个指令,在
elementUI的select组件上支持虚拟列表展示,我们在项目使用自定义指令支持下拉框的虚拟列表使用第三方插件
vue-virtual-scroll-list实现虚拟列表本文实例源码code example
个人比较推荐社区优秀成熟的第三方库去满足我们的业务,自己虽然手写了一个指令支持虚拟列表,但是在业务时间紧凑的情况下,肯定优先使用插件,除非插件不满足我们自己的业务需求,那么只能自己造轮子了。