为组内实现一个私有通用的组件库,解放重复劳动力,提高效率,让你的代码被更多小伙伴使用。
本文是笔者总结的一篇关于构建组件库的一些经验和思考,希望在项目中有所帮助。
正文开始...
初始化一个基础项目
生成基础package.json
npm init -y
安装项目指定需要的插件
npm i webpack webpack-cli html-webpack-plugin @babel/core @babel/cli @babel/preset-env webpack-dev-server --save-dev
webpack官方支持ts编写配置环境,不过需要安装几个插件支持,参考官网configuration-languages,我们今天使用ts配置webpack。
配置支持配置文件 ts
npm install --save-dev typescript ts-node @types/node @types/webpack
修改tsconfig.json
{
  "compilerOptions": {
     ...
    "module": "commonjs",
    "target": "es5",
    ...
  }
}
在.eslintrc.js中的相关配置,配置env.node:true,具体参考如下
module.exports = {
  env: {
    browser: true,
    es2021: true,
    node: true
  },
  extends: ['eslint:recommended', 'plugin:@typescript-eslint/recommended'],
  parser: '@typescript-eslint/parser',
  parserOptions: {
    ecmaVersion: 'latest',
    sourceType: 'module'
  },
  plugins: ['@typescript-eslint'],
  rules: {
    '@typescript-eslint/no-var-requires': 0,
    '@typescript-eslint/no-non-null-assertion': 0
  }
};
在根config目录新建webpack.common.ts、webpack.dev.ts、webpack.prod.ts
// webpack.common.ts
import * as path from 'path';
import * as webpack from 'webpack';
// 配置devServer
import 'webpack-dev-server';

const configCommon: webpack.Configuration = {
  entry: {
    app: path.join(__dirname, '../src/index.ts')
  },
  output: {
    path: path.join(__dirname, '../dist')
    // clean: true
  },
  module: {
    rules: [
      {
        test: /\.js$/,
        use: ['babel-loader'],
        exclude: /node_modules/
      },
      {
        test: /\.ts(x?)$/,
        use: [
          {
            loader: 'babel-loader'
          },
          {
            loader: 'ts-loader'
          }
        ],
        exclude: /node_modules/
      }
    ]
  },
  resolve: {
    extensions: ['.tsx', '.ts', '.js']
  },
  devServer: {
    static: {
      directory: path.join(__dirname, '../example') // 修改默认静态服务访问public目录
    }
  }
};
module.exports = configCommon;
webpack.dev.ts
// config/webpack.dev.ts
import * as path from 'path';
import * as webpack from 'webpack';
const { merge } = require('webpack-merge');
const HtmlWebpackPlguin = require('html-webpack-plugin');
const webpackCommon = require('./webpack.common');

const devConfig: webpack.Configuration = merge(webpackCommon, {
  devtool: 'inline-source-map',
  plugins: [
    new HtmlWebpackPlguin({
      inject: true,
      filename: 'index.html', // 只能是文件名,不能是xxx/index.html 会造成页面模版加载ejs解析错误
      template: path.resolve(__dirname, '../example/index.html'),
      title: 'example'
    })
  ]
});
module.exports = devConfig;
webpack.prod.ts
// webpack.prod.ts
const { merge } = require('webpack-merge');
import * as webpack from 'webpack';
const commonConfig = require('./webpack.common');
const prodConfig: webpack.Configuration = merge(commonConfig, {
  mode: 'production'
});

module.exports = prodConfig;
我们在根目录下创建webpack.config.ts
// webpack.config.ts
type PlainObj = Record<string, any>;
const devConfig = require('./config/webpack.dev');
const prdConfig = require('./config/webpack.prod');
module.exports = (env: PlainObj, argv: PlainObj) => {
  // 开发环境 argv会获取package.json中设置--mode的值
  if (argv.mode === 'development') {
    return devConfig;
  }
  return prdConfig;
};
在package.json中
 "scripts": {
    "test": "echo \"Error: no test specified\" && exit 1",
    "start": "webpack serve --mode development",
    "build": "webpack --mode production"
  },
运行npm run start
我们看下src/index.ts
const domApp = document.getElementById('app');
console.log(11122);
domApp!.innerHTML = 'hello word';
以上所有的这些基本都是为了支持ts环境,还有支持ts可配置webpack环境
现在我们试图将一些通用的工具函数贡献给其他小伙伴用了。
在src新建其他工具函数,例如在之前我们所用到的timerChunk分时函数
timerChunk.ts分时函数
// timerChunk.ts
// 分时函数
module.exports = (sourceArr: any[] = [], callback: (args: unknown) => void, count = 1, wait = 200) => {
  let ret: any,
    timer: any = null;
  const renderData = () => {
    for (let i = 0; i < Math.min(count, sourceArr.length); i++) {
      // 取出数据
      ret = sourceArr.shift();
      callback(ret);
    }
  };
  return () => {
    if (!timer) {
      // 利用定时器每隔200ms取出数据
      timer = setInterval(() => {
        // 如果数据取完了,就清空定时器
        if (sourceArr.length === 0) {
          clearInterval(timer);
          ret = null;
          return;
        }
        renderData();
      }, wait);
    }
  };
};
memorize缓存函数
// src/memorize.ts
/**
 * @desption 缓存函数
 * @param {*} callback
 * @returns
 */

export const memorize = (callback: callBack) => {
  let cache = false;
  let result: unknown = null;
  return () => {
    // 如果缓存标识存在,则直接返回缓存的结果
    if (cache) {
      return result;
    } else {
      // 将执行的回调函数赋值给结果
      result = callback();
      // 把缓存开关打开
      cache = true;
      // 清除传入的回调函数
      callback = null;
      return result;
    }
  };
};
isType.ts检测数据类型
/**
 * @desption 判断基础数据类型以及引用数据类型,替代typeof
 * @param {*} val
 * @returns
 */
export const isType = (val: string | object | number | any[]) => {
  return (type: string) => {
    return Object.prototype.toString.call(val) === `[object ${type}]`;
  };
};
formateUrl.ts获取url参数
import { isType } from './isType';
/**
 * @desption 将url参数转换成对象
 * @param params
 * @returns
 */
export const formateUrl = (params: string) => {
  if (isType(params)('String')) {
    if (/^http(s)?/.test(params)) {
      const url = new URL(params);
      // 将参数转换成http://localhost:8080?a=1&b=2   -> {a:1,b:2}
      return Object.fromEntries(url.searchParams.entries());
    }
    // params如果为a=1&b=2,则转换成{a:1,b:2}
    return Object.fromEntries(new URLSearchParams(params).entries());
  }
};
lazyFunction.ts懒加载函数
import { memorize } from './memorize';
/**
 * @desption 懒加载可执行函数
 * @param {*} factory
 * @returns
 */
export const lazyFunction = (factory: callBack) => {
  const fac: any = memorize(factory);
  const f = (...args: unknown[]) => fac()(...args);
  return f;
};
hasOwn.ts判断一个对象的属性是否存在
const has = Reflect.has;
const hasOwn = (obj: Record<string, any>, key: string) => has.call(obj, key);
export { hasOwn };
mergeDeep.ts深拷贝对象
import { isType } from './isType';
import { memorize } from './memorize';
/**
 * @desption 深拷贝一个对象
 * @param {*} obj
 * @param {*} targets
 */
export const mergeDeep = (obj: object, targets: object) => {
  const descriptors = Object.getOwnPropertyDescriptors(targets);
  // todo 针对不同的数据类型做value处理
  const helpFn = (val: any) => {
    if (isType(val)('String')) {
      return val;
    }
    if (isType(val)('Object')) {
      return Object.assign(Object.create({}), val);
    }
    if (isType(val)('Array')) {
      const ret: any[] = [];
      // todo 辅助函数,递归数组内部, 这里递归可以考虑用分时函数来代替优化
      const loopFn = (curentVal: any[]) => {
        curentVal.forEach((item) => {
          if (isType(item)('Object')) {
            ret.push(helpFn(item));
          } else if (isType(item)('Array')) {
            loopFn(item);
          } else {
            ret.push(item);
          }
        });
      };
      loopFn(val);
      return ret;
    }
  };
  for (const name of Object.keys(descriptors)) {
    // todo 根据name取出对象属性的每个descriptor
    const descriptor = descriptors[name];
    if (descriptor.get) {
      const fn = descriptor.get;
      Object.defineProperty(obj, name, {
        configurable: false,
        enumerable: true,
        writable: true,
        get: memorize(fn) // 参考https://github.com/webpack/webpack/blob/main/lib/index.js
      });
    } else {
      Object.defineProperty(obj, name, {
        value: helpFn(descriptor.value),
        writable: true
      });
    }
  }
  return obj;
};
我们在src中创建了以上所有的工具函数
我们在src/index.ts将上面所有的工具函数导入
// const domApp = document.getElementById('app');
// console.log(11122);
// domApp!.innerHTML = 'hello word';
export * from './memorize';
export * from './lazyFunction';
export * from './hasOwn';
export * from './getOrigin';
export * from './formateUrl';
export * from './mergeDeep';
export * from './isType';
现在需要打包不同环境的lib,通用就是umd,cjs,esm这三种方式
主要要是修改下webpack.config.output的library.type,参考官方outputlibrary
我们在config目录下新建一个webpack.target.ts
import * as webpack from 'webpack';
const prdConfig = require('./webpack.prod');
const { name } = require('../package.json');
enum LIBARY_TARGET {
  umd = 'umd',
  cjs = 'cjs',
  esm = 'esm'
}
const targetUMD: webpack.Configuration = {
  ...prdConfig,
  output: {
    ...prdConfig.output,
    filename: 'umd/index.js',
    library: {
      name,
      type: 'umd'
    }
  }
};
const targetCJS: webpack.Configuration = {
  ...prdConfig,
  output: {
    ...prdConfig.output,
    filename: 'cjs/index.js',
    library: {
      name,
      type: 'commonjs'
    }
  }
};
const targetESM: webpack.Configuration = {
  ...prdConfig,
  experiments: {
    outputModule: true
  },
  output: {
    ...prdConfig.output,
    filename: 'esm/index.js',
    library: {
      type: 'module',
      export: 'default'
    }
  }
};
const libraryTargetConfig = new Map([
  [LIBARY_TARGET.umd, targetUMD],
  [LIBARY_TARGET.cjs, targetCJS],
  [LIBARY_TARGET.esm, targetESM]
]);
module.exports = libraryTargetConfig;
在webpack.config.ts引入webpack.target.ts
// webpack.config.ts
type PlainObj = Record<string, any>;
const devConfig = require('./config/webpack.dev');
const libraryTargetConfig = require('./config/webpack.target');
module.exports = (env: PlainObj, argv: PlainObj) => {
  console.log(argv);
  // 开发环境 argv会获取package.json中设置--mode的值
  if (argv.mode === 'development') {
    return devConfig;
  }
  return libraryTargetConfig.has(argv.env.target) ? libraryTargetConfig.get(argv.env.target) : libraryTargetConfig.get('umd');
};
然后我们在package.json中配置不同模式打包
 "scripts": {
    "test": "echo \"Error: no test specified\" && exit 1",
    "start": "webpack serve --mode development",
    "build:umd": "webpack --mode production --env target=umd",
    "build:esm": "webpack --mode production --env target=esm",
    "build:cjs": "webpack --mode production --env target=cjs",
    "build": "npm run build:umd && npm run build:esm && npm run build:cjs"

  },
当我们依次执行npm run build
 在
在example目录下新建测试index.ts,同时记得修改webpack.dev.ts的entry入口文件
// example/index.ts
// ok
import * as nice_utils from '../src/index';
// umd
// const nice_utils = require('../dist/umd/index.js');
// cjs
// const { nice_utils } = require('../dist/cjs/index.js');
// esm error
// import nice_utils from '../dist/esm/index.js';

const appDom = document.getElementById('app');
appDom!.innerHTML = 'hello, 欢迎关注公众号:Web技术学苑,好好学习,天天向上!';
console.log(nice_utils);
console.log('formateUrl:', nice_utils.formateUrl('http://www.example.com?name=Maic&age=18'));
console.log('hasOwn:', nice_utils.hasOwn({ publictext: 'Web技术学苑' }, 'publictext'));
console.log('isType:', nice_utils.isType('Web技术学苑')('String'));
我们运行npm run start,测试运行下example是否ok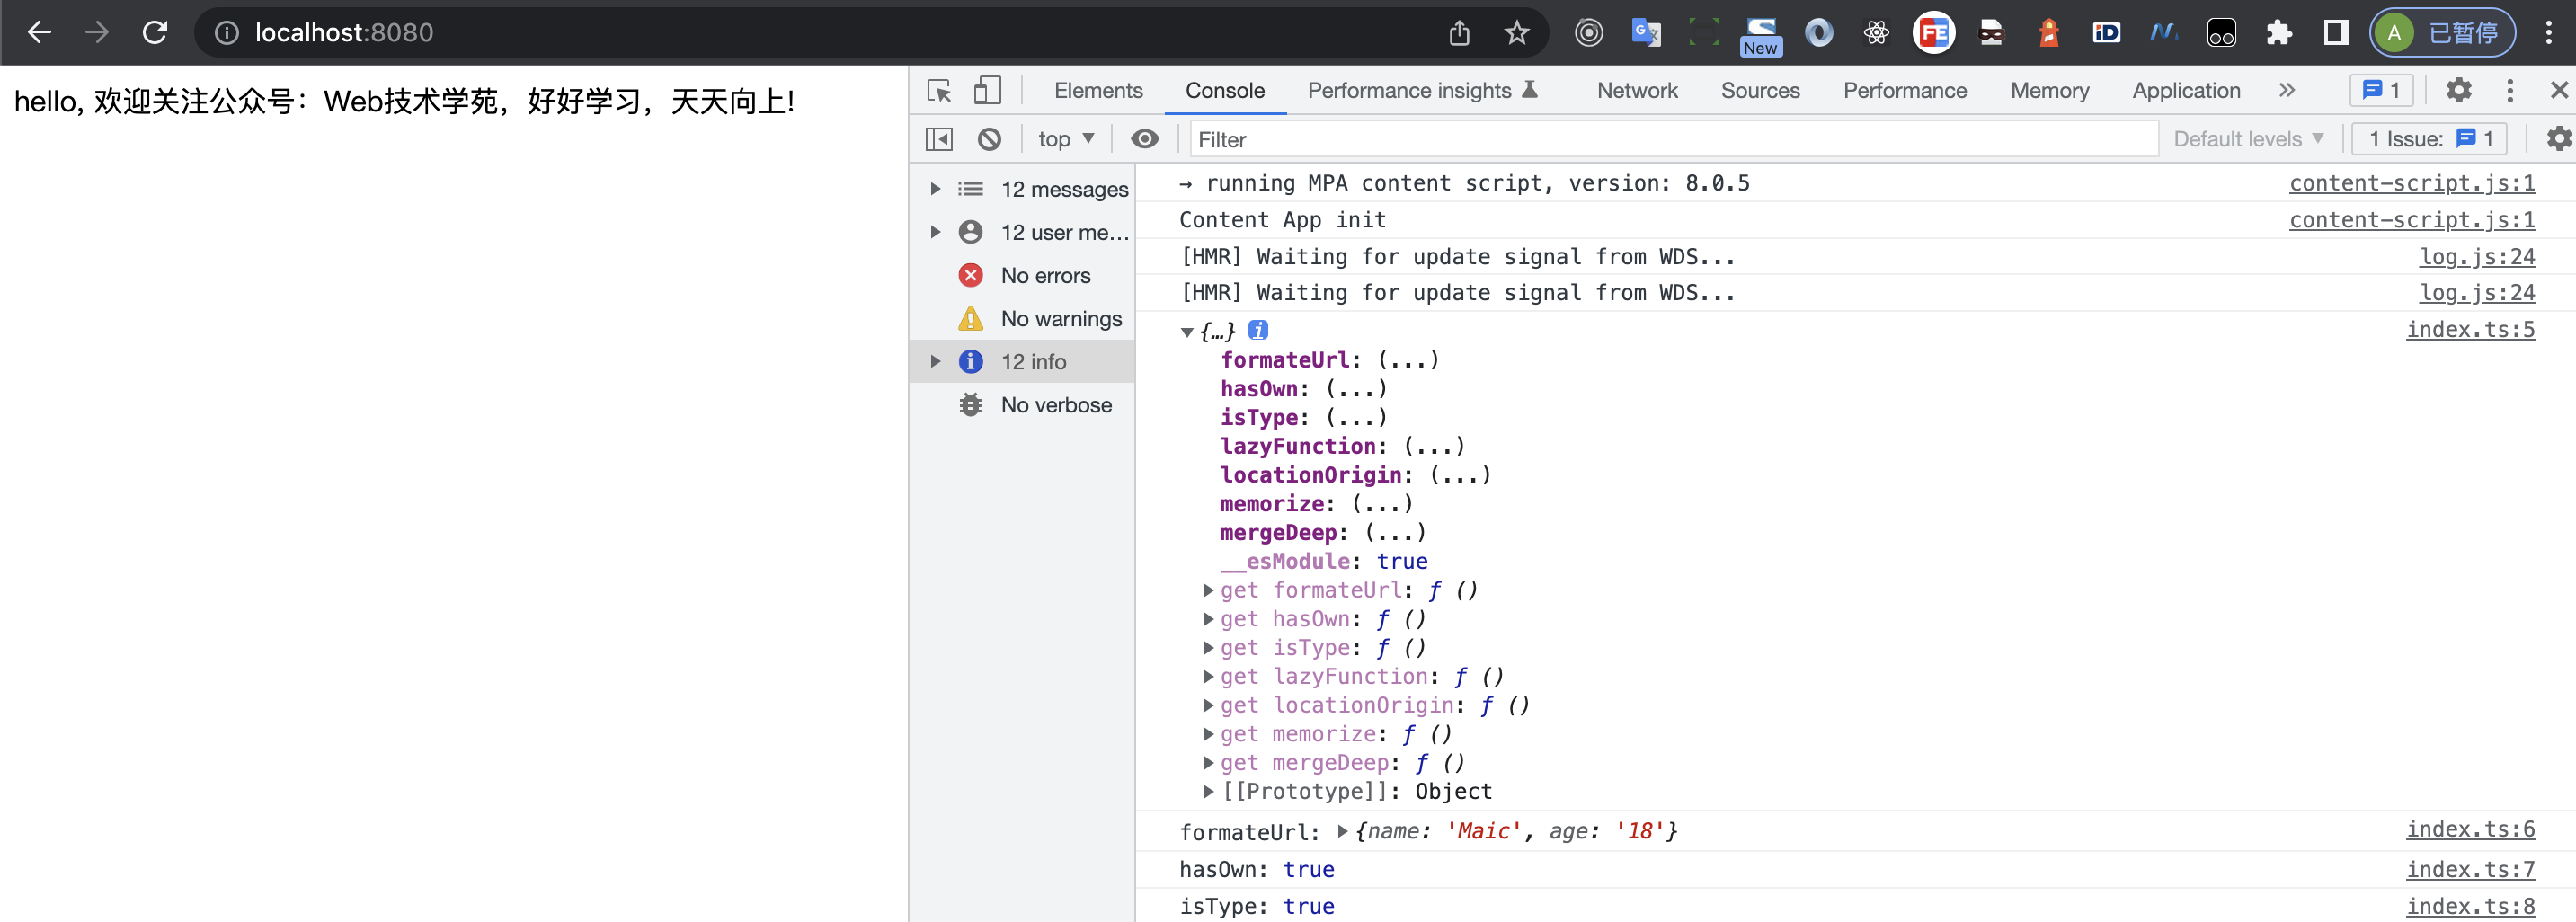
我发现esm打包出来的居然用不了,这就很坑了,难道是模块使用的问题? 
但是其他两种貌似是ok的
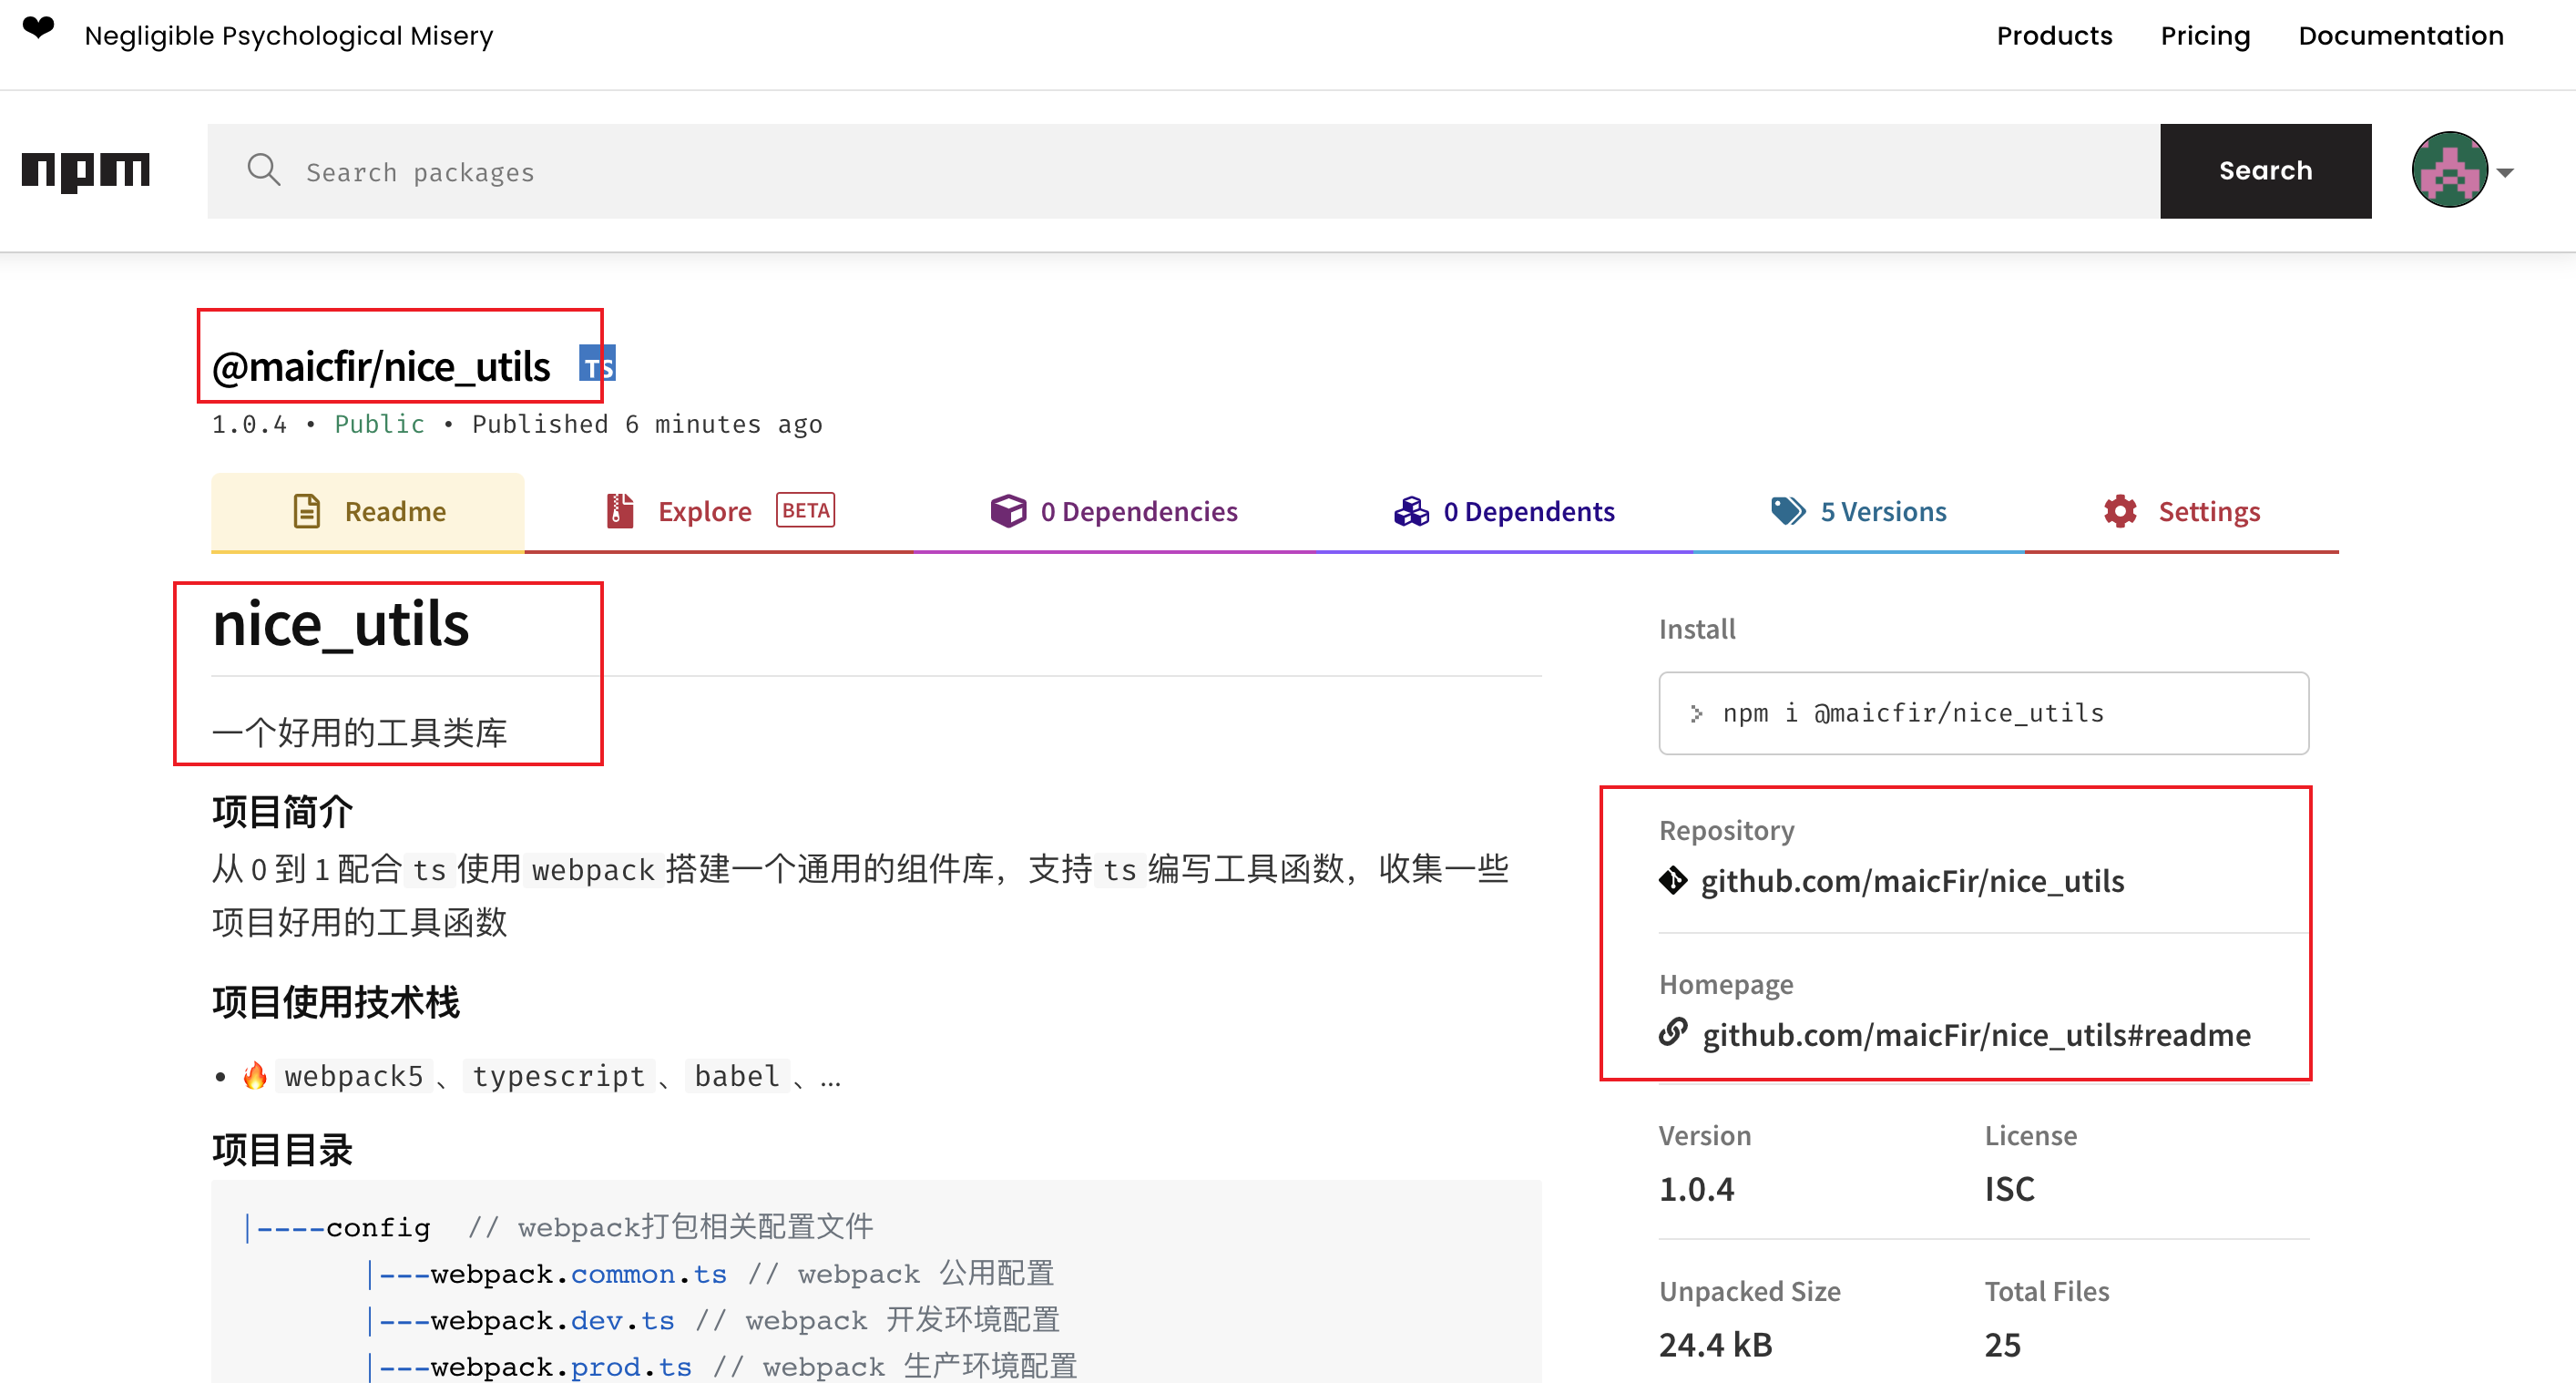
npm 发布组件
我们现在将这包发布到npm上吧
npm run build
生成dist包,并且修改package.json文件的main,指定到dist/umd/index.js下
{
  "name": "@maicfir/nice_utils",
  "version": "1.0.4",
  "description": "一个好用的工具类库",
  "main": "dist/umd/index.js",
  "types": "src/types/global.d.ts",
  ...
}
npm login- 输入自己
npm账户和密码 - 输入自己密码后,需要输入邮箱,然后 npm 会给你邮箱发个
code,把code输入即可
- 输入自己
npm publish查看 npm 上是否成功,具体可以查看nice_utils
总结
利用
webpack5配置打包ts环境,主要是让webpack5配置文件支持ts组织
webpack5打包不同library.type,支持打包成不同type,umd,cjs,ejs三种类型编写具体工具类函数
将自己写的工具类发布到
npm或者私服上,让工具类变成通用工具代码本文示例code-example